via Simply Seleta
Wednesday, June 30, 2010
Holy Olio!
Olioboard is a new interactive web tool for creating interior design mood boards online. This cool new app allows you to save, share and view product details for every board you create. It makes designing a room as easy as pie! Other programs like Photoshop, Gimp (which is what I currently use to create boards) and Polyvore require more time and effort to 'shop', crop, scale, arrange items, etc. Olioboard puts all the tools you need right at your finger tips! It's super easy to use and comes with over 10,000 preloaded home decor items to choose from over 300+ brands. I literally opened it up, designed an entire room and had a spec list in just minutes! It's free to use and let me warn you, VERY ADDICTIVE! Here's some boards created by Olioboard users;
I am super excited to play around some more with this new interactive tool! Has anyone else tried it out yet? Do you love it as much as I do?!
Tuesday, June 29, 2010
My pair of chairs
A while back I did a post about my knock-off arco lamp that I have hidden away in storage. It will sit there until one day I have a house big enough to incorporate it into the decor (and once I convince everyone it really isn't a safety hazard!) Along with my mid-century lamp, I have two really cool chairs stashed away in storage as well. They are a pair that sit really low, are made of natural woven material, and fold up to be moved and stored easily. When my grandma passed away I knew there were two things of hers that I wanted - those chairs and her turquoise necklace, the two things of hers that I have loved since I was a little girl. I am pretty sure these chairs date back to the 50's or 60's, but I don't know anything else about them. Anyways, imagine my excitement when I spotted MY CHAIRS in these pictures!
Isn't it the coolest chair? And even better, I have two of them!
Monday, June 28, 2010
Project Update: Michele's Greatroom
Well, I am back from the coast and had a crazy, long weekend helping my sister Michele re-vamp the upstairs of her townhouse on the beach. (You might remember me mentioning it here.) I'm exhausted to say the least! Our to-do list was pretty hefty and we got a large majority of it all completed. I didn't take into account dry time on the poly urethane coats on the coffee table and dining table (you really should let it sit for 48 hours before touching it) so we weren't able to completely set up the space, accessorize and stage it for pictures, like I had hoped. The sofa slip cover hasn't arrived yet either, so things are still partially unfinished. I'll be heading back to Santa Cruz this coming up weekend (for 4th of July!) so I will be able to tie up the loose ends and take some more pictures. In the meantime, here are a few shots of some of the projects we tackled;
Barstools - Before
Barstools - After. I used fabric I already had (left over from an old client of mine) so we were able to complete these for $0!
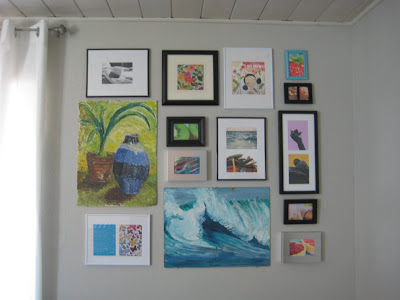
Here's the art gallery wall that we created, which is the focal point of the room. My grandma did the two large paintings over 40 years ago and I really love their vibrant colors! I created some of the prints in Photoshop and the rest of the artwork and photography came from one of the other roommates. We used frames that we already had and only had to purchase a couple more. Total cost for this project was $12! You can see the wall color here (BM Revere Pewter) and also catch a glimpse of the new white drapes as well!
Dining Table - Before
The prettiest shade of glossy turquoise, EVER! (BM Burbank Blue)
Dining Table - After
More photos of the completed space to follow, next week!
Friday, June 25, 2010
Gallery Wall
I did it! I took the plunge! I finally created an art gallery wall in my living room and I couldn't be happier with the impact that it creates in the space! It still needs a little tweaking and the room is far from being complete, so no pictures to share just yet. I am going to be working on a big project this weekend where we will be installing an even larger art gallery wall so needless to say, I have had them on the brain for a while! Here are some images that inspired my wall, as well as the one I will be creating this weekend. I can't wait to share 'after' photos with you!
via Elle Decor
via Belle Maison
via Design Around Denver
via Domino
via Chic Tip
via Belle Maison
via Coastal Living
via From the Right Bank
via House of Turquoise
via Young House Love
via Turquoise
via Houzz
via Chic Tip
via Kristin Buckingham
via Domino
via Angie Hranowsky
Which look do you prefer- Matching frames hung in an organized manner? Mismatched finishes hung randomly? Or mix of both?
Thursday, June 24, 2010
Room of the day
via Decor Pad
I'm loving the tall ceiling, architectural details, gray upholstery and feminine accents!
Wednesday, June 23, 2010
Wedding Wednesday!
After attending a wedding on the beach two weeks ago, I have been obsessing over sand-in-your-toes style ceremonies! If I ever actually get married, it will definately be on the beach, that's for sure! I'm thinking somewhere like Carmel or Monterey, California. . . But lets not count our chickens before they hatch. :) Take a look at these gorgeous weddings. . .
images via Style Me Pretty & various unknown sources
Need help designing and planning your wedding? JPM Design offers special events coordinating and decorating services! Contact me for more information.
Need help designing and planning your wedding? JPM Design offers special events coordinating and decorating services! Contact me for more information.
Tuesday, June 22, 2010
Current Project: Great Room Makeover
I'm heading to Santa Cruz on Friday to spend the weekend with my sister, Michele. Typically when I go visit her it's like a mini vacay - we lounge around on the beach working on our tans, go shopping, go for bike rides, go out to eat, visit friends, etc. Well, not this time! We are going to undergo a whirl wind weekend filled with DIY projects, repourposing, painting, re-upholstering and more! Michele has been dying to makeover her great room and this weekend we are going to do just that. Here's a glimpse of what her space currently looks like:
She rents a townhouse that is two blocks from the beach in Santa Cruz and shares it with two roommates. The newest roommate that just moved in brought with her a very large, but very comfortable chaise (not shown in the above pictures.) Here is the design concept board and floor plan I came up with:
We are on a major budget (read: starving-college-student-type of budget. Michele currently goes to Cabrillo College and will be transferring soon to California State Univ. Monterey Bay and is going to become a teacher. She works at a kids camp in the summertime and during the school year she runs an aftershool program at an elementary school. She is one busy chica!) Like I said, the budget it tight, really tight.
The big splurges we made are the sofa slipcover and white grommeted drapes. We will be painting the walls gray (color TBD) and repurposing and refurbishing all of her existing furniture. (Remember the table and chairs I blogged about a while back?) I also have a bunch of left over fabrics from previous clients' projects that we are going to use in the space. We raided my mom's storage shed last weekend and found all sorts of treasures that we are going to repurpose! I also have a lamp, some artwork and accessories that are stored in my garage that we will be using as well.
Next week I'll share all the details and before and after photos with you! I'm exhausted already just thinking about all of the sanding, painting, work, work, work, but you know I love it all!
Monday, June 21, 2010
Friday, June 18, 2010
Blue & White Striped Rugs
Is it just me, or do striped rugs instantly add a casual, beach-y flair to any room? Specifically blue and white rugs, in my opinion.
I am still anxiously awaiting the arrival of my Dash & Albert rug for my bathroom! (If you missed that post, check it out here.) I can't wait to get it in place and finally put the finishing touches on my bathroom! Here's some images of striped rugs to tide me (and you) over until then.
I am still anxiously awaiting the arrival of my Dash & Albert rug for my bathroom! (If you missed that post, check it out here.) I can't wait to get it in place and finally put the finishing touches on my bathroom! Here's some images of striped rugs to tide me (and you) over until then.
images via Coastal Living, Elle Decor, Tim Clarke, Censational Girl, West Elm, and Unknown
Subscribe to:
Comments (Atom)


